Due to its properties, marble has been a popular building material for thousands of years. Color, optimal hardness, unique drawing or brilliant shine are properties that are used above all in projects where its aesthetic elements stand out.
However, it is not appropriate to use marble everywhere. Nowadays, we encounter highly polished marble in bathrooms, kitchens, or on the floors of entrance halls. Due to its properties, granite is suitable for these mentioned elements. It offers the same range of beautiful materials, with the difference that it is more resistant to mechanical and chemical damage. I mention it precisely because people very often confuse marble with granite. We mentioned the difference in these materials in the article "granite or marble".
What are the downsides of polished marble? Frequent mistakes or concerns from practice
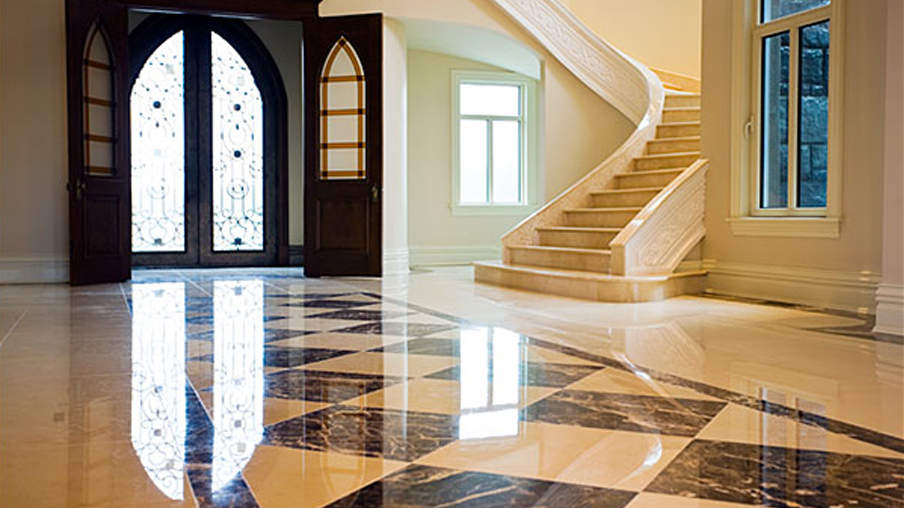
What does such polished marble look like? It is a marble surface polished to a mirror shine, in which the reflection can be read in detail when viewed against the light. Even from the examples below, such demanding processing is not used in historical buildings, but the material is only processed to a semi-gloss, or matte gloss (undergloss).
- Marble is a relatively soft material, which is why sculptors like to use it in their work. Thanks to chisels and a hammer, they were able to create majestic sculptures and historical works. Why is it a good thing to mention? Imagine a small stone pressed into the sole of a shoe. Just like sculpting tools, the harder pebble carves a groove in the beautifully polished marble floor in the entrance hall of the family home.
- A polished marble kitchen worktop? Did you know that polished marble is extremely sensitive to an acidic environment? That is, if you get lemon juice, wine, vinegar or juice on polished marble, not only will a stain remain, but the shine will be lost in the given place.
- What are the pitfalls of polished marble bathrooms? Mainly calcareous efflorescence or scale. But beware! Limescale cleaners are largely acid-based, and this damages the shine on polished marble.
- Have you laid a polished marble floor in a new building, the masters covered it with cardboard so that it would not be destroyed, and after uncovering and washing, the floor is destroyed? It's because the construction dust in this case is like abrasive that got between the cardboard and the floor. Here, nothing but polishing will help, similar to the video below.

"Marble is not a problematic material. Maintaining a high gloss is problematic"
PHOTO: source internet
Do you have polished marble and need to restore its shine?
Marble polishing is a demanding process that requires a great deal of patience, attention to detail and the right technical equipment. We offer you 10 proven steps to polish marble and achieve perfect results at home.
- Preparation of space. Start by clearing the area around the polished area. Cover furniture or floor. It is worked with a rotating tool together with water. there is a risk of splattering surrounding objects.
- Surface cleaning. Remove dirt, greasy spots. Use only marble cleaners (LINK). Avoid acidic cleaners, they are not suitable for cleaning marble.
- Surface repair. Check whether the material needs to be caulked or glued. If so, use polyester sealants suitable for repairing marble.
- Use of grinding wheels. In the case of scratches, it is necessary to sand the surface to a plane with a suitable sanding disc. You can use diamond polishing discs for marble, or a cheaper option for smaller projects, marble sanding papers, so-called emery sheets.
- Use of polishing paste. If the surface is intact and undamaged, apply polishing paste or polishing gel to the marble, leave for a while and polish with a soft cloth or felt disc at low speed. Be sure to thoroughly polish the entire surface.
- Mechanical polishing with diamond polishing pads for marble. Polishing takes place at low speeds together with water, which releases the polishing chemistry. A more detailed procedure is mentioned a few lines below.
- Surface cleaning. During polishing, films or deposits of material are formed, which must be removed using warm water and a soft cloth. After removing the unwanted material, dry the surface.
- Applications of protective coating (impregnation). By choosing a suitable impregnation, you will increase the surface resistance of the material and thereby reduce the susceptibility to chemical and mechanical damage.
- Protection against damage. Avoid using acidic cleaners, hard sponges, metal scrapers or any harsh cleaning tools and agents.
- Regular maintenance. To maintain a long-term shine, use alkaline and gentle cleaners designed for polished marble, while avoiding any acidic substances that could damage the surface (vinegar, wine, lemon juice...).
Which sanding disc to use for sanding scratches or grooves?
If you have a scratched polished marble surface, you must remember that the degree or depth of the scratch is adequate to some size of the grit of the grinding or polishing wheel. This means that the thickness of the scratch would it should have been at least the same as the grain thickness of the first grinding or polishing wheel.
In practice, this means that if you have a "fine web" in your polish, you will probably need to start with a #400 or #800 grit. If the scratch is deep enough to catch a fingernail, it will be necessary to sand with a coarser grit. Maybe up to grit #30 or #50 and then continue with other grits up to a high gloss.
A brief selection of polishing discs for polishing marble at home
In our offer you will find several polishing discs for dry polishing of marble. We would like to introduce you to the most used ones.
- Sandpaper for marble, also called emery, is still the most effective and most used polishing disc for dry processing of marble. It is mainly used for polishing edges and corners, but also for sculptural work. It has a favorable price and is also suitable for larger projects.
- Diamond polishing pads for dry polishing are a little more expensive than sandpaper, but with a significantly longer service life. They are suitable for polishing edges, corners, but also for polishing surfaces. They are less flexible than sandpapers and thus polish the plane better.
- Flexible MARMOR polishing disc designed for wet work. These polishes contain a mixture of fine polishing diamond and acid, which is activated on contact with water. It is suitable for polishing small surfaces and for polishing floors with a floor polisher (product used in the video). A more detailed procedure is mentioned in the article below.
How to polish with flexible marble polishing discs? (VIDEO-polishing the marble floor after laying it, in a new building)
The tools contain a mixture of fine diamond and chemistry that etch the surface of the stone and aid in polishing. The process starts with #300 grit and ends with #10000. Using a small amount of water activates the chemistry contained in the roll. Using slow revolutions, we spread evenly over the entire surface of the marble. For smaller diameters, a low-speed cordless drill is also suitable for this work.
Sludge forms between the polishing wheel and the surface of the stone, which also contains chemicals along with abrasives. Therefore, it is not harmful to leave the sludge with the given grain size during polishing. When changing the disc and thus when changing the grain size, it is necessary to thoroughly rinse the surface of the polishing residue and repeat the procedure.
In the video, the disc diameter is 400 mm.
Description of grains, products and a brief procedure on how to polish marble
- Phase, grinding is considered rough working of the stone with grit from #24,36 or #60. Hard grinding wheels or diamond flexible tools with #30 or #50 grit can be used for this step.
- The phase is smoothing the scratches after sanding and then highlighting the color. Using grits from #120,220 will smooth the surface from rough traces after sanding, and grits #400 to 800 will enhance the color and achieve a gloss. In this step, it can be polished with flexible diamond pads, sandpaper and polishing pads.
- Phase - achieving a high gloss. As you may have noticed, the first and second stages use relatively similar tools. To achieve a high gloss, it is necessary to use really specific tools. This is because a high gloss is achieved on marble by etching the surface with chemistry. They contain polishing pads or a hard polishing disc for marble. The mentioned polishing discs achieve a higher shine than marble polishing gel or polishing paste, which are polished with a felt disc.
How not to do it, or what to pay attention to?
- Grind sensitively, do not press, make even movements over the entire surface. Try to keep the sanding wheel flush with the surface.
Beware of high revolutions during polishing. Repeat slow and circular movements over the entire surface of the material. - Do not ignore regular maintenance and keep the marble in good condition. This will prevent the loss of shine and the difficult process of restoring the shine.
- Regular renewal of the protective coating (impregnation) is an important point in regular maintenance.
- Marble is a sensitive material to mechanical damage. Protect it from sharp objects.
- Test new products and their effects in an inconspicuous place and only when you are convinced of the result, apply to the entire surface.
How to protect polished marble so that its beauty is not lost?
- Professional cleaning agents suitable for marble - Lem3 (top cleaner), Ultrastripper (very strong), B-Super Cleaner, B-sanychlor.
- By crystallization - with the help of a chemical solution, higher strength, resistance and gloss are obtained on the surface. Attention, the application is recommended only for professional use and after thorough training.
- Impregnation suitable for polished marble surfaces - Idea HP (protection against water and oils), Idea XC (color enhancement - wet effect), Block D70 (suitable for food contact), L&L (cleaner + wax).
- Floor waxes: RR/1, AS11, B-wax glossy.
Our client had a polished marble floor of a beautiful black color in the store and ...
... after a period of use, in frequented places, for example in the place of the entrance door, the shine wore down to a complete matte, and the floor remained not as nice as the owner originally imagined. After a joint consultation, using a floor sander and diamond brushes, he sanded the entire surface with grit #36. This resulted in a complete matte surface with an ancient - weathered effect.
The surface treated in this way is very absorbent and it was necessary to impregnate the marble surface with a proper protective coating.

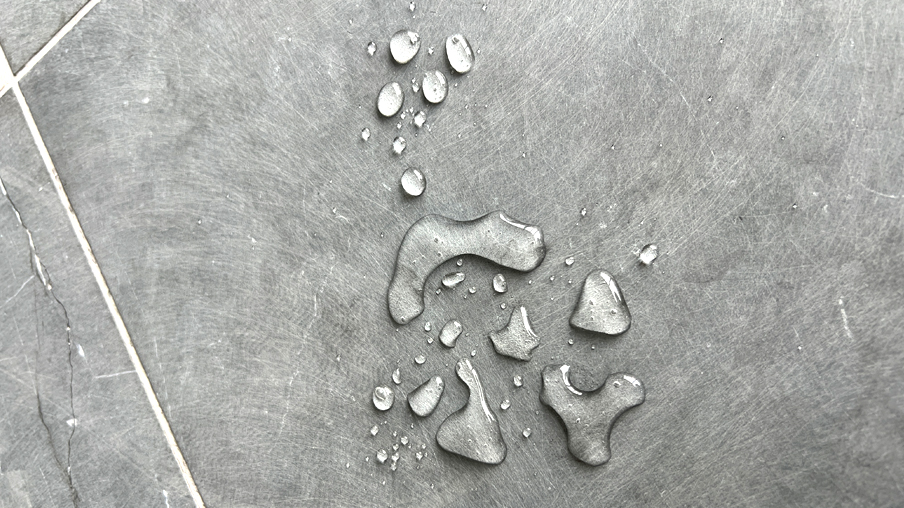
Photo: detail of the surface of the impregnated marble
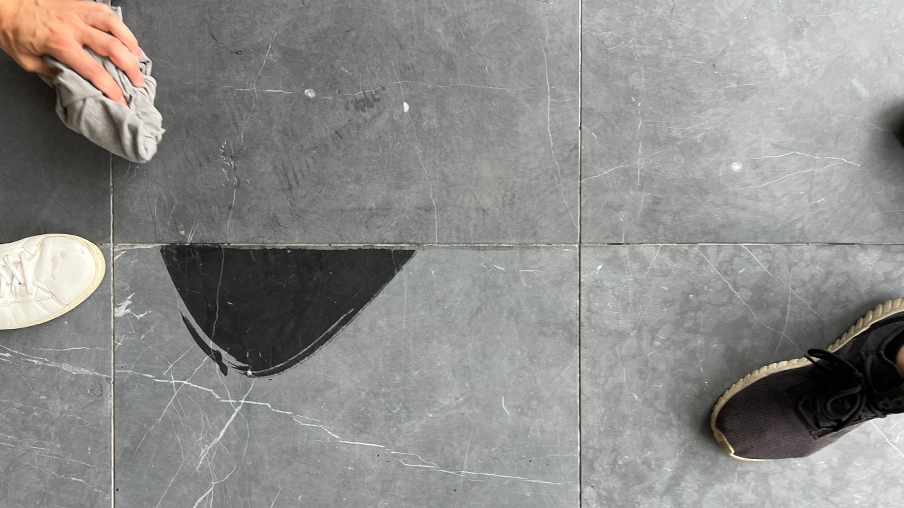
In the photo (photo above) there is a close-up of the treated surface (without highlighting the color), where the water is not absorbed into the material, but drops remain on the surface. Subsequently, we wiped the same drops of water with a towel towards the untreated surface, where the liquid immediately formed a dark film and thus was absorbed into the surface of the unprotected material (photo below).

The photo shows that the upper part of the pavement is slightly different in color than the unprotected part at the bottom of the photo.
Conclusion
Marble is an exceptional material for exceptional projects. As you may have read, it is not a stone for everyone. And that's what makes it all the more special. Like you, marble needs care.
